I’m Mike Buckby and I run this website to share great photos and stories of motorcycle restorations. In my spare time I indulge in the odd restoration myself and here’s some of the things that I’ve been up to …..
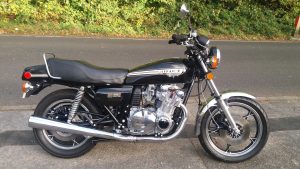
Suzuki GS1000E Finished.
The finished bike looking stunning in black.
Suzuki GS1000E Restoration Update
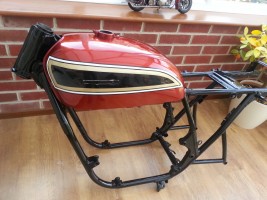
My bike is now starting to look like a motorcycle again.
The engine is in the frame, both wheels have been re-painted and the rims polished.
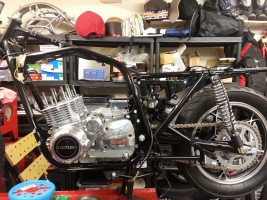
Starting to look like a bike again
Suzuki GS1000E restoration
My latest restoration project is a 1978 Suzuki GS1000E. I completely stripped the bike and sent the frame off for powder coating.
All of the nuts, bolts and fasteners were cleaned and dropped off for zinc plating and the fork bottoms and engine cases were sent for polishing.
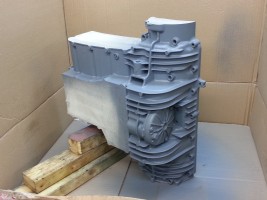
The engine was stripped down to the cases for cleaning and painting.

Very dirty bottom engine case.
After cleaning and primed.
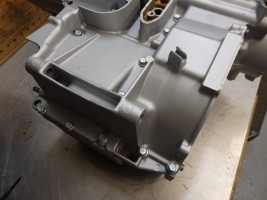
Reassembled with the original zinc plated S bolts
The bottom end was rebuilt, the crank was good so a new cam chain was installed and new piston rings were fitted.
Rebuilt bottom end.
The frame was collected and looks stunning, a really good job.
More to come!
Honda CB750 restoration
This Honda was originally registered in the USA and arrived into the UK after having a hard life. The bike was completely stripped and restored from the frame up. The original exhausts were in good condition so I fitted new heat shields and end caps.
The fuel tank and side panels were professionally finished and new badges were fitted.
Many new parts were used including the seat, forks, wiring loom and mudguards.
I’m really pleased with how this one came out – as was its new owner!
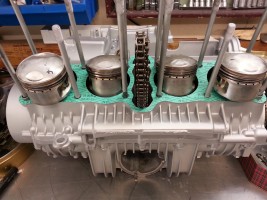
Honda CBX1000 Engine Overhaul
I decided to crack on with the CBX project and tackle that mammoth engine. Everything came apart without any drama and the good news is that the pistons and more importantly the Crankshaft look to be in good condition with no major wear. The primary chain will most definitely need replacing as it has worn through the oiler, apparently this is a classic sign of a worn chain.

Note the worn Oiler on the left.
You can see from the Picture above the difference, the Oiler drips oil onto the Primary chain when the engine is running but as soon as the chain has any slack it rubs and wears the Oiler, which in turn prevents the Oiler from working!
This part is now unobtainable but I was lucky enough to spot one on eBay.com in the USA.

With everything stripped out from the engine cases I will need to make a shopping list to include:
Primary Chain
Cam Chain
Bearings
Oil Seals – Some of which are not obtainable from Honda anymore but I have discovered a very useful source in Holland ..
Six Center Motors – http://www.sixcenter.nl/
They have a good range of parts and have the Oil Seals that are needed.

I have cleaned the cases and have decided to have them Soda-Blasted before paint. Normally I would have them Vapour Blasted but with this you always run the risk of some of the small particles used ending up blocking an oilway. Soda by its very nature dissolves in water so as long as the cases are thoroughly rinsed and the oilways blown through with an Airline everything should be OK. I’ve never tried this before and will post the results as soon as the cases return.
So there we have it, the engine is now spread across the workbench and with new paint and internals it should be a pleasure to re-build.
Honda GL1000KZ – Goldwing Restoration
My project Honda Goldwing, …
“I bought this last year as I always fancied the look of the original naked Goldwings and can remember admiring one back in the 70’s. I found it on eBay.com and it’s been tucked away in a small shed ever since. After looking on your website and seeing your projects I’m inspired and really must get on with sorting this bike out”.

“I’ve got my work cut out with this as most of the bike is there but the engine has been dismantled and it’s always harder to put something back together that was taken apart by someone else. I hope to get it finished sometime next year and look forward to posting pictures of my bike when its finished”
Honda CB750KZ Practical Classic Part 3
Following on from the last post on our practical classic for £500 project, the Oil Seal for the gear change has now arrived and it’s time to put it back together.
As mentioned before the shaft was covered with years of grime and old engine oil and this was stopping it from operating correctly leaving us with a very sticky gear change and a lever that was not returning to the center.
The next step was to remove the old Oil Seal.

Remove the old Oil Seal
After cleaning, the new one is simply pushed into place.

And press in the new one
The cleaned shaft can then be lightly oiled, inserted from the right and pushed through.

Slide the shaft through the Engine
Remember to re-engage it with the gear change drum by lifting the sprung lever.

Lift the lever back over the gearchange drum
Finally its back on with the clutch, the clutch cover, the rear brake lever and the clutch cable.
Now onto the front brakes, the right hand front calliper had a bolt in place of the original bleed nipple and was also dragging on the disk. Further examination showed that the bleed nipple had sheared off at some point and a bolt with a larger thread used to replace it. This would make bleeding the system near on impossible and it was decided that with the obvious problems with the calliper it would be wise to find a replacement.
A quick trawl though eBay.co.uk netted a replacement for £10.00. In the next update we will be stripping the new caliper, cleaning and replacing the seal before fitting it to the bike.
Honda CB750KZ Practical Classic Part 2
During the initial assessment of our useable classic for under £500 project we noticed that the gear change was very stiff and made changing gear more or less impossible. The problem appeared to be with the gearchange mechanism rather than the gearbox as it was possible to find all of the gears with some effort.
The movement of the gear lever is transferred through a shaft that rotates, this shaft passes through the engine from left to right and then hooks up to the main gearchange mechanism behind the clutch. The shaft has a spring so that once pressed the gear lever returns to the central position ready for the next change.
Step one was to get the bike up on the ramp and drain the oil so we could get inside the engine cases and start to investigate, we would have changed the Oil as a matter of course as who knows how long its been in there!

Locate the Oil Drain Plug

Drain the Oil

And remove the Filter
The next step is to move the the right hand side of the bike as the clutch needs to be removed to gain access to the shaft, first remove the brake pedal and clutch cable before removing the clutch cover.

Remove the Brake Pedal and Clutch Cable

Remove the Clutch Cover
Once the clutch has been removed the shaft is accessible and can be removed from the right once it has been disengaged from the gearchange drum. To disengage just lift the lever upwards while sliding the shaft out.

From the Right, the sprung lever needs to be lifted to remove the shaft

The shaft should slide out quite easily but this one needed some force, this would explain the stiff gearchange and marks on both ends proved that this was not the first time this had been removed.

With the Shaft removed it was just a simple process of cleaning both the shaft and the holes it passes through to remove the years of built up oil and gunge, I used some emery cloth on the shaft and then very carefully cleaned out the holes with a cloth, you do need to be careful that nothing falls back down into the engine cases as any bits of swarf could be picked up by the oil pump and cause further damage to the engine.

Before the Shaft is placed back into position its worth renewing the Oil Seal on the left side, this will simply pop out and the new one is pressed into place by hand.
So there we are the gearchange should now be smooth a silk, total cost £4.00 for the Oil Seal.
Next we’ll putting it all back together and moving onto the front brakes.
Honda CB750KZ Practical Classic on a Budget


Unusual bleed nipple, bakes will require some attention.

Looks like it needs a new chain…… That will hit the budget.


The journey begins, first step is to give everything a good clean and then have a look at that gearbox problem.
Check back for an update and to see if it is possible to get this bike back on the road for under £500!
Honda CB750KZ Restored

I bought this bike from a Motorcycle Breakers as a non-runner, well it did run but sounded like a Diesel and smoked just as much! I had a tight budget and limited time so all I wanted to do was to get the bike looking good and get out in the sunshine. I ordered new Piston Rings, Gaskets, and Cam Chains from David Silver and set to work. The engine came apart without any problems and once degreased and cleaned was given three coats of silver engine paint. Next I set about spraying the frame with gloss black and polishing any alloy parts. The Tank was left as it was not too bad and I like the original colour.
I couldn’t find any original exhausts ( I hear that they are very rare now) so I opted for an aftermarket 4 into 2 system that looked very similar to the CB900 system fitted to the motorbikes in the early 80’s.
So there we are a quick run down of my four month project from a Scrap motorbike to running around the country lanes where I live, enjoying the sun………When it shines!!!!
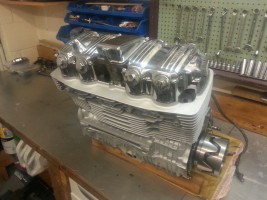
Restoration Project Honda CBX1000 Part 3
Things have moved on since my last post and I now have a near complete rolling chassis, I mentioned last time that the original finish on the wheels would be hard to replicate and I had chosen to get them chrome powder coated.
As you can see from the photos they now look very good and I’m pleased with the results. I was even happier once the tyres were fitted without marking or chipping the finish!


The chain adjusters and rear wheel spindle have all been re-chromed and look really good with the freshly plated nuts and bolts. The front and rear discs were cleaned, carefully masked using normal masking tape, trimmed with a sharp knife and then sprayed Satin Black. While I was masking and trimming I took the opportunity to strip down the clocks and using the same method achieved a really good finish on the clock surrounds and the brackets.

When I got the CBX one of the footrest plates had been chrome plated and although not original I have decided to keep this and have had the other side chromed to match.
I cleaned the wiring loom and replaced and repaired the covering in a couple of places and this is all now back on the bike, the last job on the chassis is the brakes and they are all now cleaned and repainted ready to be rebuilt with new seals.


So there we are, moving on nicely and starting to look like a motorcycle.
Next I’ll be tackling that Mammoth Engine!
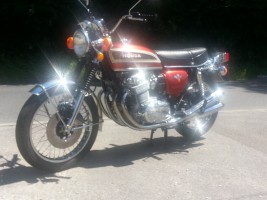
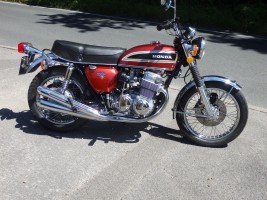
Yamaha XJR1300 – Bike Review
 This is my Yamaha XJR1300, I bought this back in October 2000 after seeing one at the NEC Bike Show some years before. The XJR was only 17 months old and had covered less than 3,000 miles, the first owner had found it to be too big and sold it back to the dealer after just five months. The next owner kept it for a year but sold it as he really wanted and sports bike. So there I was with a bike that was in mint condition with very few miles.
Over the years of ownership, other bikes, a young and growing family and long working hours have prevented me from riding the XJR as much as I would have liked. We did take the bike on tour in Devon and Cornwall a few years ago and with a second hand set of luggage bought from the Freeads it made a very good touring bike.

 To date the bike has only covered 6600 miles and still looks as good as it did eleven years ago.
MOT History:
May 2003 – 3681 Miles
June 2004 – 4111 Miles
April 2006 – 4317 Miles
June 2007 – 5116 Miles
July 2008 – 5548 Miles
April 2010 – 6596 Miles
Too many bikes and other commitments mean that my beloved XJR1300 is now up for sale and listed on eBay. Its been a rock solid bike and incredibly still has it’s original battery, I started the bike up last week after the winter and didn’t even need to charge it up! Just pressed the button and off she went.
Suzuki GT750 Restored
My GT750 restoration …. the before and after pictures of mine. As you can see it was a bit of a mess when I first got hold of it but after a year spent polishing, visiting auto jumbles and searching on eBay I finally have what I wanted. There was a guy at college years ago that had a Kettle with a sports seat and a three onto one, I really liked it and wanted mine to be the same. The sound from the Piper is awesome and always draws a crowd.


Suzuki GT750 Restoration Update Part 2
As promised here is an update on the progress of the “tidy up” on the rear of my GT750.
As mentioned in the previous post a new rear wheel would have been nice but too expensive so I spent a few hours with the Dremel and Autosol polishing the wheel hub and then used some Emery Cloth on the spokes to get them looking presentable. The brake drum and sprocket carrier were collected from the Polishers and with the new wheel spindle, spacers from the Kettle Club and the newly zinc plated nuts and bolts I’m very pleased with the outcome.

Before

After
The results above clearly show what can be achieved with a little time and effort, total cost…… less than £60.00!
New Restoration Project Honda CBX1000 Part 2
OK, some of you guessed correctly that the frame in the earlier post was in fact a Honda CBX1000, I said the clues were there and I think the poster on the wall gave it away!

I bought this bike as a pile of bits that had been stripped as the engine was making funny noises, actually it was described to me as sounding like “a washing machine full of spoons on a spin cycle!!”
Apart from the engine everything else looked to be present and correct and it is a genuine UK CBX1000Z, the same as the poster in my workshop that once was on my bedroom wall when I was Sixteen!

As I’ve never attempted one of these before I decided to tackle the Frame and Running gear first and then have a look at that monster engine.
I found all of the nuts, bolts and other fixing that needed Zinc Plating and rather than spending time trying to make them as good as possible by hand before plating, I managed to get some time on a Vapour Blaster, they say preparation is everything and look at the results…..Perfect.

The next step was to take all of the cycle parts to get Powder Coated, and what to do with the wheels? The standard finish on the Honda Comstar wheel is very hard to replicate but after a chat with the guy at the Powder Coaters we decided to have them Chrome Powder Coated! This process is the same as normal Powder Coat with the addition of a coat of lacquer, this should reach all of the nooks and crannies and make the wheels look very good. I’ll let you know when I get them back.
So there we are, most parts are still away but as soon as they return I can start to re-assemble this Iconic Classic Motorcycle.
Yamaha XS1100 Restored
“I’ve always fancied owning another XS1100 as I had one many years ago. I couldn’t believe my luck when this one turned up only 3 miles from where I live, it even had an MOT but was suffering from the usual XS1100 second gear problems. A deal was struck, the bike was taxed and ridden home (minus second gear). After reading the forums and searching the net I discovered that with a little jigging about the offending gears can be changed without splitting the engine cases, so out came the engine.
With the engine out I couldn’t resist going further so I had the frame and swinging arm powder coated, the fork seals were replaced, all nuts and bolts zinc plated and everything else was given a general tidy up.
I very pleased with the outcome and I’m out most days enjoying my XS, I’d still like to do more especially on the engine finish but with the summer approaching I’ll wait till the dark and wet days of winter”.


Suzuki GT750 Delkevic Exhaust
Delkevic who have been manufacturing exhausts for many years have released a copy of the original Suzuki GT750 exhaust system.

The exhaust is full replica of the original system with removable baffles and is supplied in “triple chrome” finish with all clamp rings and fixings.
Following the success of the Honda CBX 1000 system demand has been very high and at present there is a waiting list, Delkavic have nearly 100 sets on order and currently producing 20 sets per month.
If you already have one of these please let us know what you think of it.
I’m sure like me there are many Kettle owners out there who can’t wait to get their hands on one.

Suzuki GT550 Restored
I thought I’d share one of my earlier restorations with you, a few years ago while trawling through eBay I discovered a rather sad looking GT550, having owned most of the GT’s over the years I placed a bid and forgot about it. Three days later it was mine but over 150 miles away!! The wife’s 4X4 was pressed into service and off we went to collect what was once a Suzuki GT550.


Once I returned and laid everything out on the lawn I realised that this was going to be a long term project. I sorted through and made two piles, good and scrap, the scrap pile was bigger than the good one!
Over time it slowly came together, the frame was given the normal Powder Coat treatment and new parts were sourced from far and wide, the Tank was a NOS item found on eBay USA and purchased for $25.00, a real bargain and an unusual color for the GT550. I was also very lucky with the Engine, it only needed new rings and many hours polishing the cases.
Over the years rebuilding and restoring many bikes I’m always amazed at how with each bike you meet a new set of enthusiasts, this time I met a like minded GT550 fan who I still stay in touch with now, his and many others advice was invaluable in getting this old smoker back on the road.
After far too many hours it was finally finished and considering what I had to start with I was pleased with the result.


The very last photograph was sent to me a year later when the new owner of My GT550 noticed a picture of the bike on a forum. It now resides in the very north of Scotland having been restored on the south coast! its great to know its still being used and enjoyed.
Suzuki GT750 Restoration Update
While the parts for my latest project were away for plating, chroming and powder coating I had a close look at the GT750, I’ve never been totally happy with the rear of the bike and set about making it look better.
A new rear wheel would be nice but expensive so I elected to spend some time cleaning the one I have as the spokes and rim should be OK with a good polish. The Brake Hub and Sprocket carrier have been taken down to the local metal polishers and any odd nuts and bolts are off for zinc plating.
I managed to find a very nice stainless steel wheel spindle and have ordered new wheel spacers and footrest bolts from the Kettle Club. The parts from Kettle Club look to very good and should make a difference to overall finish.

More to follow and I’ll post some pictures of the result when its back together.
Kawasaki KH250 Restored
A photo of my Kawasaki KH250. I’ve had this bike for over 10 years and it’s been a sort of rolling restoration, I’ve replaced many parts with better ones the most coming from eBay. When I picked it up it was in boxes as the previous owner had taken it apart when the middle cylinder seized. I managed to get a replacement cylinder from the USA via eBay and ordered a new piston and rings, I was lucky as the bottom end was undamaged and after a little tinkering it ran fine.
Over the years I replaced the exhausts, seat and found a really nice tank that sets the bike off.

Suzuki GT250 Restored
A couple of pictures of my Suzuki GT250 that I restored a couple of years ago. I had one when I was seventeen and wanted to re capture my lost youth, after looking through the Freeadds I finally found the example in the picture below, it was in someone’s shed not too far from where I live, as you can see it had be painted at some point, rusty but looked to be complete.

I spent many hours scouring Auto Jumbles, eBay and the local free papers for parts, I wanted the bike to be as close to my original as possible. After just over a year it was complete and I’m very pleased with the result.

New Bike Restoration Project
My latest motorcycle project is now stripped and on the bench for restoration to begin. This will be a complete nut and bolt restoration with the aim being to get the bike back as original as possible.

I’ll leave you to guess the make and model (the clues are there!)
Keep checking back for progress reports, product reviews and hints and tips.
Kawasaki KZ1000P Restored
A couple of pictures of my Kawasaki KZ1000P ex USA Police Bike. Although not a full blown restoration as the GT750 was I hope you find it interesting.
I saw this bike advertised in a local paper a couple of years ago and being a fan of the 1970’s TV programme “CHiPs” I went and had a look, money changed hands and it was mine, I couldn’t resist singing the theme tune all the way home.
Originally this was registered to the Washington State Patrol but at some time, probably in the UK, it had been sprayed in California Highway Patrol colours. As you can see from the first picture it was far from original, missing its rear boxes, crash bars and the front fairing. Over time I managed to find a complete set of boxes for sale on eBay in the USA and had them imported together with an original fairing and brackets. I fitted the rear boxes but decided to fit the earlier front end and with an aftermarket screen it gave the bike that CHiPs look from the 1970’s. To keep it road legal the front spots have clear lenses and the graphics on the side panels have been changed with the word “Police” omitted.


Suzuki GT750 Restored
In 2005 I was the highest bidder on a GT750 project sold on eBay.co.uk , I’d previously owned other GT’s and just finished restoring a GT250 but my heart was always set on the 750. Apparently the engine on this one had blown an oil seal many years ago, the bike was then stripped and put into a damp shed for years.
The first job was list everything in the boxes, check what could be re used and make a shopping list of everything needed, the tank was rotten as was the seat mudguards and wheels.


As I wanted to keep as many parts of the original bike as possible and had a limited budget everything that could be was cleaned and sent away for plating or powder coating. The crank was sent off to SEP in Kegworth for a full rebuild and seals, the engine cases to RD Cox for Vapour Blasting, the frame etc to Trestans in Southampton for Powder Coating and all of the nuts and bolts to a local platers.
Here we can see the bike starting to come together (100-1949) in the background is my friends GT used as a pattern to get the wiring etc in the correct places. I discovered that restorations are always easier if you take the bike apart yourself with plenty of photos along the way rather than trying to build something from boxes! The finish on the frame was excellent especially when you consider how it looked when it emerged from the damp shed.
Mudguards, shocks and light fittings all cam from eBay and I set about the task of looking for a decent original exhaust system within a reasonable budget.

More pictures as the bike takes shape, note the new wiring loom and the very nice front wheel purchased for $25.00 from the USA!


Next came the engine, all the parts were checked, the barrels rebored, new pistons and rings fitted and a replacement water pump fitted. I cleaned the carbs by hand and was very pleased with what can be achieved with some time and hard work, although I wanted a very nice GT I also had to be aware of cost and along the way had to make decisions on when and what to spend money on especially as I still had not found an exhaust.


Starting to look like a bike again, the engine in the frame with freshly plated nut and bolts.
I’ve seen perfect Exhaust systems go for £700.00 plus and this was way outside of my budget, finally an Exhaust was found at a very reasonable $295.00 through eBay.com USA. It was listed as being in good condition with only a couple of very small marks. It took six weeks to arrive and although a gamble as to its actual condition and hoping it didn’t get damaged in transit it arrived ands for the price I was very pleased with it.

The finished bike, with the Tank and Side panels also being found on eBay.co.uk . The original plan was for it to be blue but when the Tank arrived I liked the colour and although not original its very nice it also saved the cost of a respray.


So there we have it, my GT750 is now finished without spending a fortune and I’ve spent many happy hours smoking around the roads where I live with a big grin on my face pretending to 17 again.
________________________________________________________________

________________________________________________________________
Top 10 Most Viewed Restorations Today
Sorry. No data so far.
________________________________________________________________